PICKLE CREEK RANCH
  • Home
    • Contact
  • Cheryl In Texas Art
    • Pixels - Art Prints
    • Fine Art America - Art Prints
    • Redbubble - Art Prints
  • Photography
    • Cheryl's PIXELS page
    • Cheryl's FINE ART AMERICA page
    • Cheryl's REDBUBBLE art
  • Essential Oils
    • Nature at its Best
    • Resources
    • Our Founder - D Gary Young
    • Product Line
    • Monthly Promos
    • Young Living News
  • The Ranch
  • Blog

The Blog Page

Communicating about essential oils, nature, photography, chickens and inspirations along the way.


YLEO SIGN UP

Veggie Tian from the Garden

7/15/2022

1 Comment

 
Picture

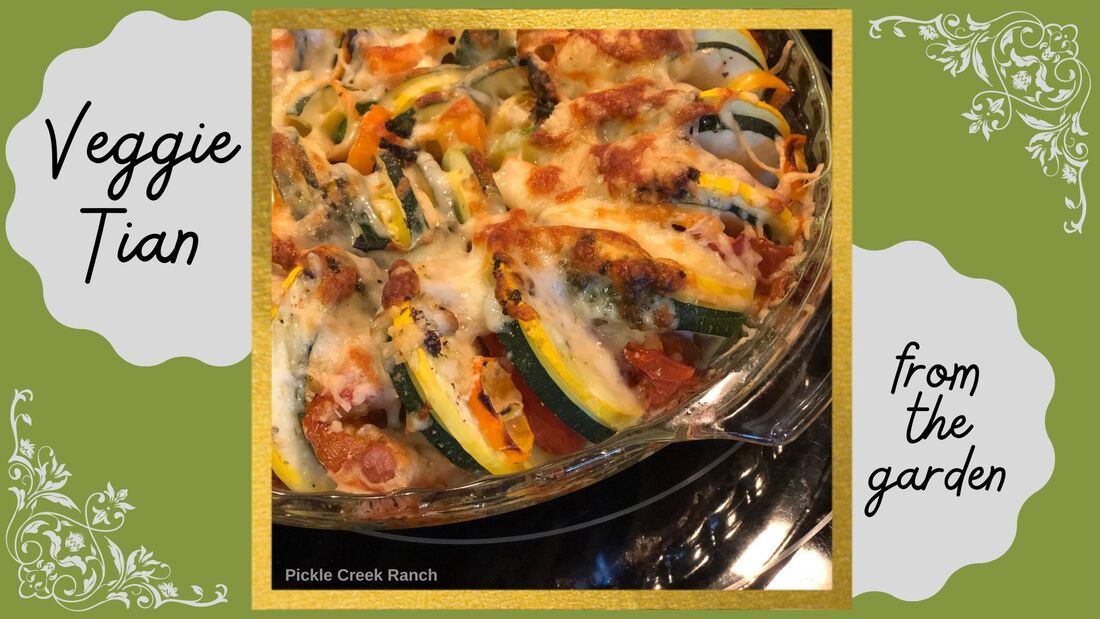
Veggie Tian from the Garden. Have you tried it?

We have a large garden producing lots of squash and a friend told me about "tian" and sent me a recipe! Oh my gosh, it is sooo good. I have to share my version of it with you! It looks complicated but it's really simple.
Picture
Preheat your oven to 400°. Lightly coat a pie pan with cooking spray or oil.

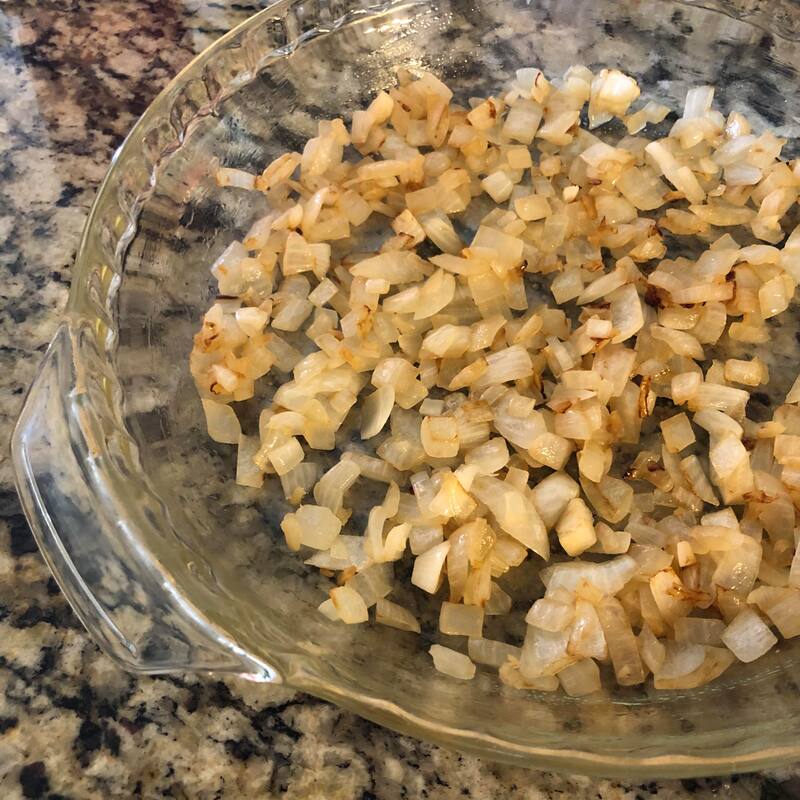
I use my Instant Pot for all kinds of cooking and food prep like this. Select the Sauté setting and cook up a small onion or more if you want extra! Crush a couple cloves of garlic and throw that in there. Cook till it's golden, then spread out over the bottom of your pie pan.

Picture
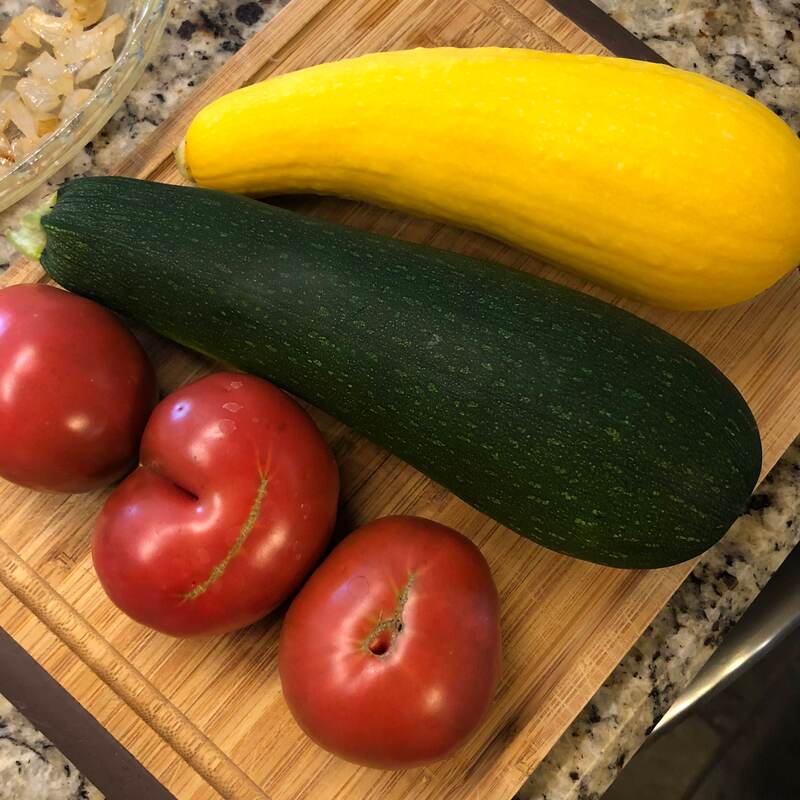
I brought in fresh tomatoes, yellow squash and zucchini from our garden!
Picture
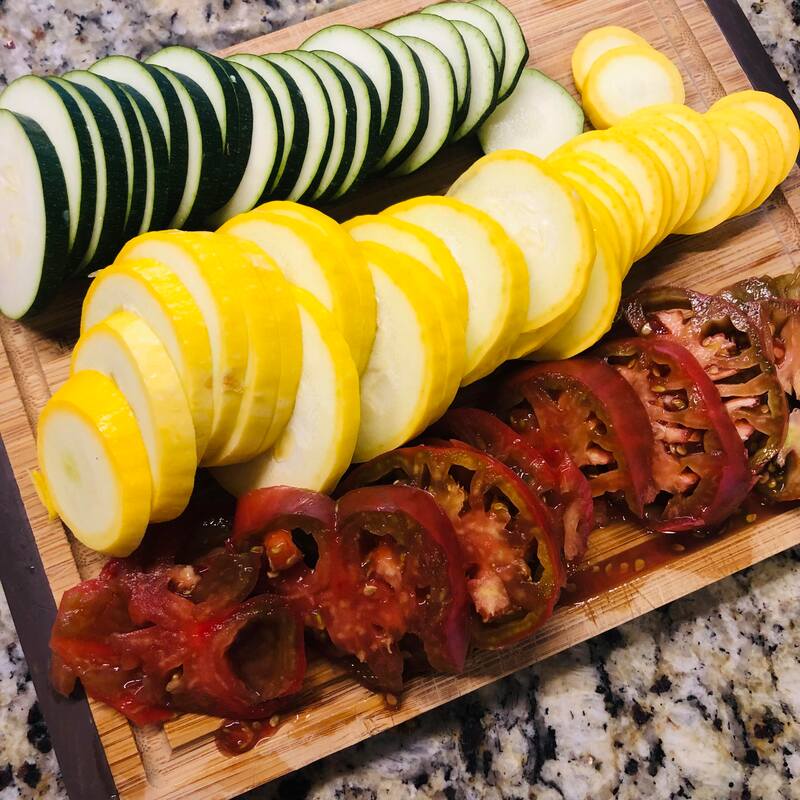
Next, slice them up! Ok, I never said I was Pioneer Woman. LOL
Picture
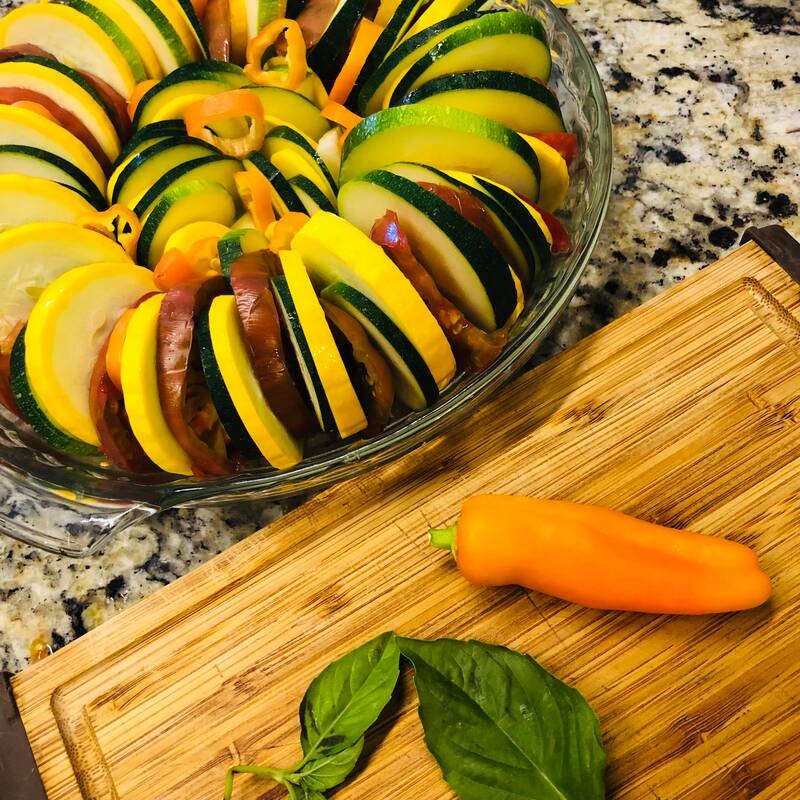
Arrange them one after another around the plate. I even added some sliced Hungarian Sweet Peppers and some leaves of basil. Some people slice potatoes and put in there too. I drizzled some olive oil across the top and then spread some of my homemade basil pesto sauce all over it, then sprinkled some pepper and seasoning. There's a seasoning you can get that's no salt and it tastes good!
Picture
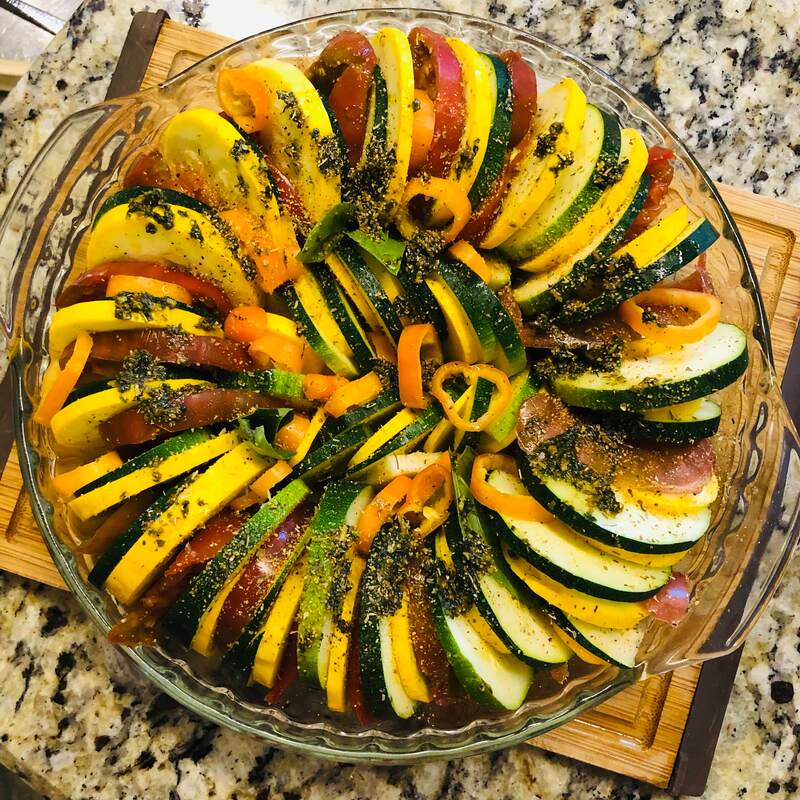
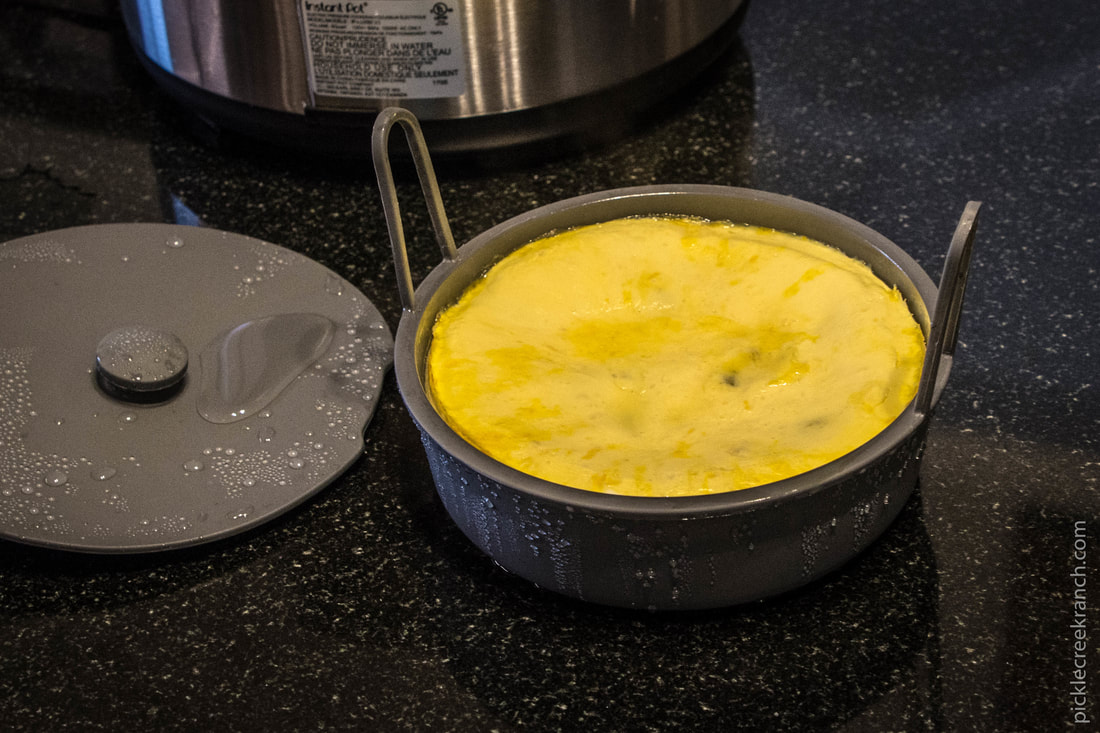
Doesn't it look pretty? Not done yet!  Cover it with foil and bake in the oven for 30 minutes!
Picture
Picture
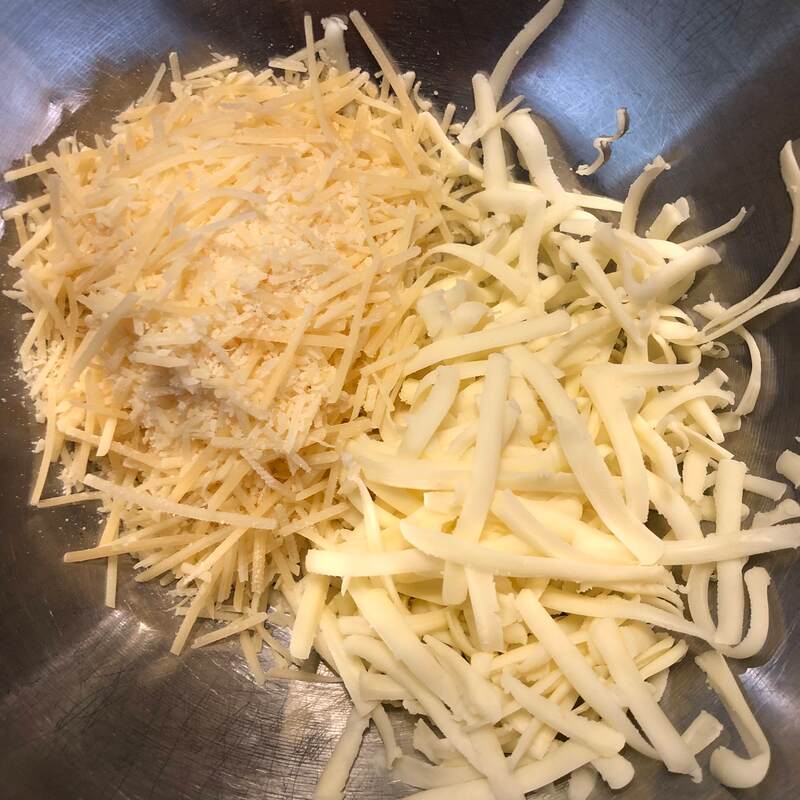
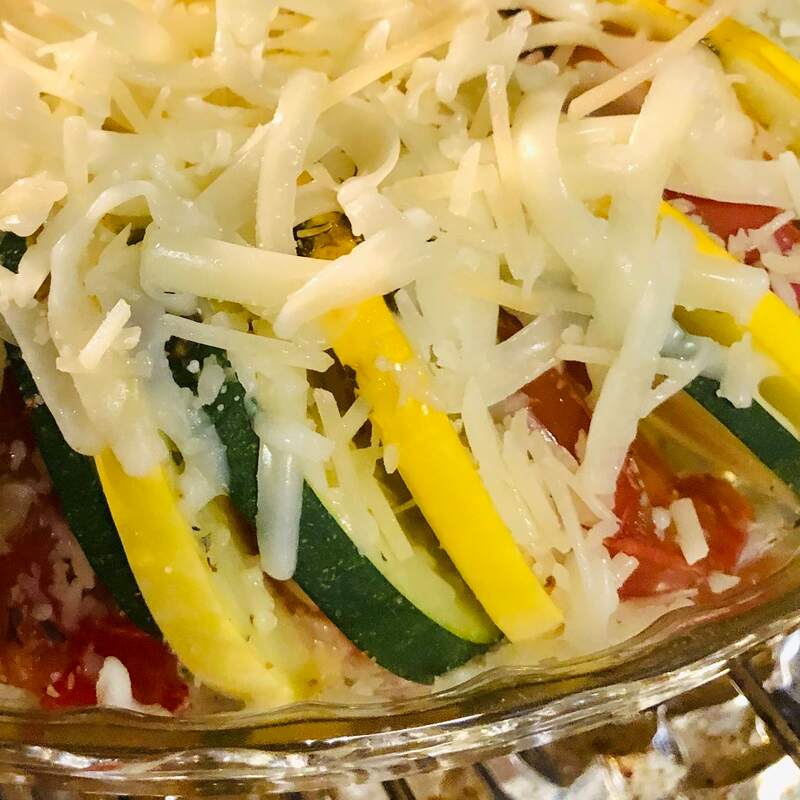
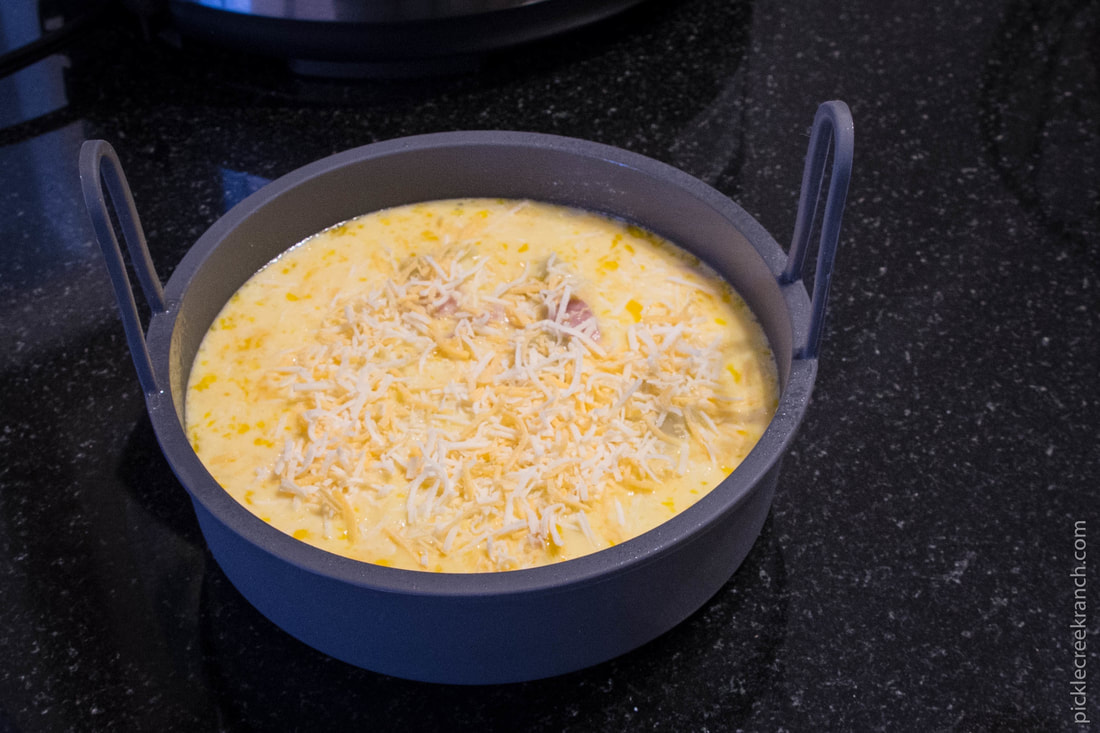
Last step. Take out of the oven, remove the foil and add cheese, then bake for another 15 minutes. I added Parmesan cheese, about a fourth cup sprinkled around and in between spaces. We like cheese! It is normally topped with Mozzarella but I didn't have any. I had Monterey Jack. Use what'cha got, my friend at Texas Homesteader says! She has great ideas and recipes galore!
Picture
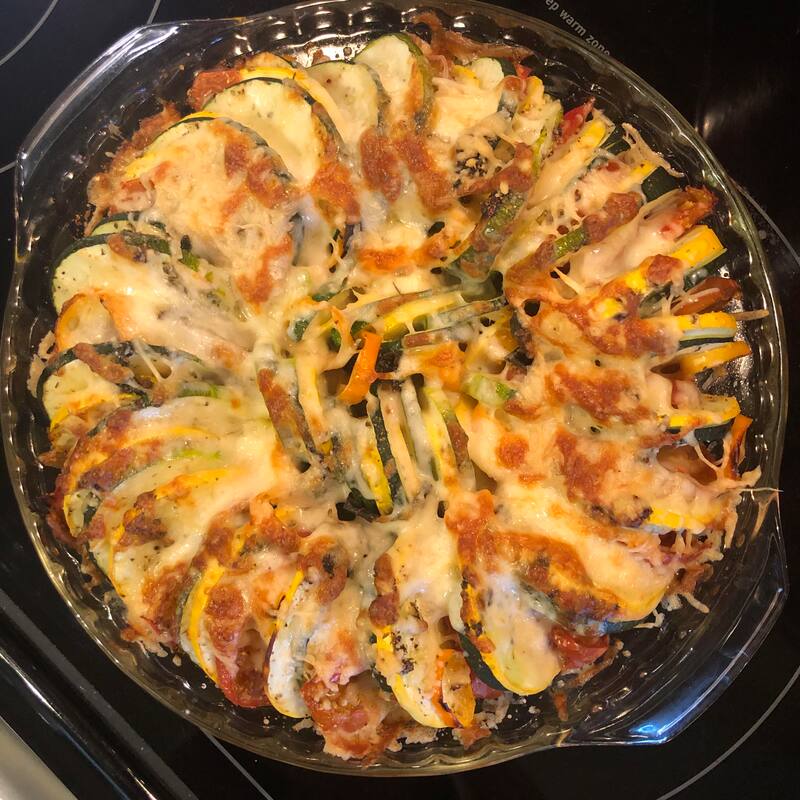
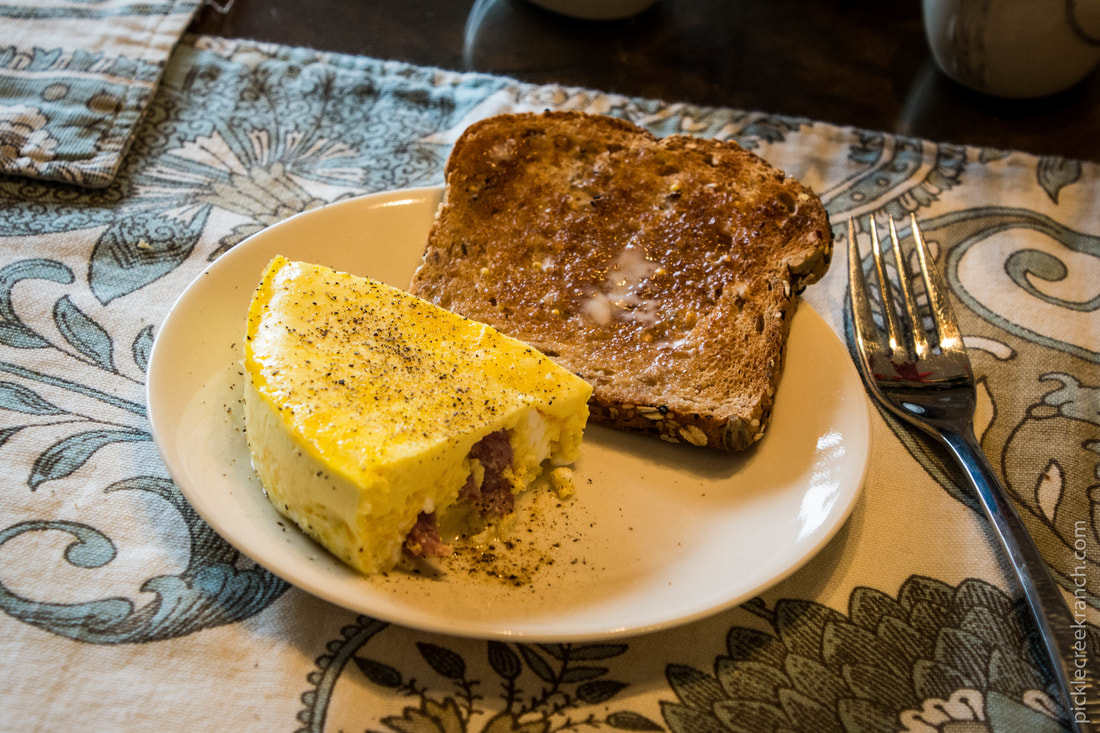
Cooked it till it was golden and soooo good!!! It's even good cold. We had this one night with a big salad and it hit the spot!
INGREDIENTS
  • Oil or cooking spray
  • Tablespoon olive oil or more for drizzling (optional Pesto sauce)
  • 1 mediium to large onion, diced
  • 2 garlic cloves, crushed
  • 1 medium zucchini, thinly sliced
  • 1 medium yellow squash, thinly sliced
  • 1 - 2 tomatoes, thinly sliced
  • 3 Hungarian sweet peppers, seeded and thinly sliced (optional)
  • Fresh Basil leaves (optional)
  • 1/4-1/2 teaspoon Italian seasoning
  • Salt and pepper to taste
  • 2 Tablespoons grated Parmesan cheese
  • 1/4 cup shredded Mozarella cheese
INSTRUCTIONS
  1. Preheat oven to 400°, lightly coat a deep dish pie pan with oil or use a nonstick coating.
  2. Using an Instant Pot, (or a medium pan) set to sauté and cook chopped onion and garlic till soft and transluscent. 5-7 minutes. Spread cooked onion and garlic on the bottom of the pan.
  3. Alternate sliced veggies, standing them on edge, all the way around the pan, filling in the middle, adding any extra veggies if desired.
  4. Drizzle 1 tablespoon olive oil and season with salt, pepper. If you have pesto sauce, spread it around too, If not, use Italian seasoning. Stuff fresh basil leaves in between a few of the sllices (optional). Cover with foil and bake covered for 30 minutes.
  5. Remove aluminum foil and sprinkle Parmesan cheese and then Mozarella on top. If you don't have Mozarella, use what you already have! Put back in oven and bake uncovered for 15 minutes or till cheese is golden brown.
I hope you try this recipe and let me know how you liked it! I can't wait to make another pan of it after we are done eating the first one!

Happy eating!
Cheryl @picklecreekranch


1 Comment

Hard Boiled Eggs from the Instant Pot

9/15/2020

0 Comments

 
Picture

Hard Boiled Eggs from the Instant Pot
Using Duck Eggs!

By Cheryl L. McClure

When we began our journey with chicken keeping and duck keeping, I had no idea about eating duck eggs. I thought this would be an eye opener for those who, like me, just didn't know! Yes, you can eat duck eggs and they are great for baking and frying and even hard boiled!! They are a bird just like chickens and so why not? Some may find the taste a little richer in flavor and the texture not much different, but to us, they really enhance the baked goods we use them in.
Picture
Small duck egg on left, double yolk duck egg on the right, chicken egg on top.
One of our hens is laying double yolk eggs (you go girl!) and the ducklings we hatched earlier this year have grown up and started laying small eggs. Hopefully they will get bigger as they get older! The brown egg is a nice sized chicken egg to show for comparison.

What better way to use the small duck eggs than to make hard-boiled eggs in the instant pot!

Picture
Normally when I cook hard-boiled chicken eggs in the instant pot, I use the 5-5-5 method. Put several in a basket, add a cup of water, set the pressure to manual for five minutes, then natural pressure release for five minutes, then five minutes in an ice bath. Works perfect every time.
Picture
Knowing that I want to have hard-boiled eggs in bulk to chop up and add to my chicken salad or regular salad I wanted to try it this way. All my duck eggs in this batch are a little smaller than chicken eggs. The beauty of this process: no peeling eggshells!! Woo hoo!

I’ve seen this done before in other recipes for the instant pot. You might want to check out Texas Homesteader and see how she cooks her chicken eggs. She has some other great recipes too.

Picture
Picture
Picture
Instructions:
  • Crack 8 small eggs into a buttered 7 inch silicone pie pan (with lid) and place on trivet over 1 cup of water. Put the lid on! (I got my baskets and silicone pie pan at QVC. They fit perfectly.)
  • Set to manual pressure for 5 minutes.
  • Natural pressure release for 10 minutes.

But Oops! I forgot and left them in for 38 minutes!!!!!!!! Lol!

No worries! They came out fine! I was able to chop them up and use half of them in our chicken salad and store the other half in the fridge to add to our garden salad. What a great sandwich!

Picture
I like to add chopped celery, pickle relish, grapes, craisins and sometimes pecans to my chicken salad. Adding essential oils to your recipe is also an option as there is a whole culinary set to access at essenty.com/cherylintexas and one tiny drop goes a long way!

Enjoy your hard boiled eggs!!

Cheryl @ Pickle Creek Ranch

picklecreekranch.com
essenty.com/cherylintexas - Nature at its Best


PS: You don't have to have a drake for a (duck) hen to lay eggs. But the good thing about chicken and duck keeping is we can grow our flock any time, with the help of the boys.

Follow our journey at the ranch on Facebook and Instagram!


0 Comments

Instant Pot Cilantro and Lime Rice

8/18/2019

0 Comments

 
Picture

Instant Pot Cilantro Lime and Rice
by Cheryl L. McClure

We love a good rice recipe to eat with Tex Mex here at the ranch and this sounded so good! Not to mention, it tastes good!! Recently, my favorite home & health products company came out with Cilantro Vitality essential oil and I was excited to give it a try in this dish.

We use a 6 qt Instant Pot and it cooks rice perfectly every time so I did not hesitate to experiment and it turned out delicious!! Most recipes for the Instant Pot will use the same ratio for rice as for water, so makes it easy to remember.

We use it for a lot of different dishes, but FYI it's a great appliance for cooking beans from dry to done in no time!

Picture
Anyway, this side dish is so EZ to make but if I don’t have all the fresh spices, herbs and fruits, I have essential oils to replace them, right here in the cupboard!

Here are some of the Vitality line of essential oils that would come in handy for this recipe or to flavor any Tex-Mex meal!

Picture
You can find all these and more at essenty.com/cherylintexas - Use my member number to purchase! #1176855
While the weather was cool in the springtime, I was able to harvest my own from the garden and it was soooo good! I love all the texture and color with cilantro, but I find so often, that I want to cook something with cilantro and I don’t have any, don't have enough or it has gone bad.

We don’t live around the corner from the grocery store, so having essential oils is like having fresh herbs in a bottle! They're ready to use at any time.

It only takes a little, so use sparingly. The good thing is, you can use herbs  fresh, dried or essential oils interchangeably or together in recipes. Don't be a fraidy cat! Experiment with your oils and herbs and adjust to your own taste, just start low and add from there.

Note, you will want to add all your essential oils after the rice has cooked.

INGREDIENTS:
2 cups Jasmine Rice (or long grain white rice)
2 cups chicken broth (or water)
1 teaspoon salt
2 tablespoons butter to add to rice
+
1 drop Bay Vitality (Laurus Nobilis)
1 drop Cumin Vitality
3 drops Citrus Fresh Vitality
2 drops Lemon Vitality
2 drops Lime Vitality
2 drops Cilantro Vitality
1 drop Black Pepper Vitality
1 drop Orange Vitality
Butter or olive oil to mix EOs into

OR use fresh/dry ingredients
2 fresh bay leaves
1/2 teaspoon ground cumin
4 tablespoons of fresh lime juice
2 teaspoons lime zest
1 tablespoon lemon juice
1 tablespoon orange juice
4 tablespoons chopped cilantro
Butter

INSTRUCTIONS:

  1. Butter the inside of the instant pot.
  2. Add 2 cups rinsed and drained rice and 2 cups chicken broth. Throw in 2 fresh bay leaves.
  3. Set Instant Pot manual pressure for 4 minutes, after done, allow 11-18 minutes natural pressure release.
  4. Add butter with essential oils or your fresh/dried herbs, combine all.
  5. Enjoy!
This makes a double batch, about 6 cups, which I like because after I've used it as a side there are leftovers to use in a soup or casserole.

Hope you enjoy this dish and discover more ways to use this great line of Vitality essential oils in cooking. Let me know what worked for you!

Cheryl @ Pickle Creek Ranch
essenty.com/cherylintexas
picklecreekranch.com

If you would like to order any of the essential oils for cooking you can do so through either website, you will just need my member number to order.
CL McClure - Member #1176855

You can order retail or save 24% by becoming a member. I'd be happy to tell you all about it!

Young Living is the leader in the essential oil industry because they have what no other company has, the Seed to Seal promise. I do not recommend any other oil besides Young Living.

0 Comments

Instant Pot Egg Frittata

2/13/2018

0 Comments


Instant Pot Egg Frittata
by Cheryl L. McClure

Picture
We recently purchased an Instant Pot! We got the 6 quart size since it’s just the two of us and didn’t know how much we would REALLY use it. Turns out, we absolutely love our instant pot!

The first thing I made was black eyed peas without meat, just to test it out and see how good it would make the black eyed peas taste. That simple recipe far exceeded our expectations so we were excited to try more recipes. I didn't even use greens or meat in it and it was fantastic!


Whenever I first started cooking with it, the main thing I wanted to know is what size pot is the recipe made for?? A lot of recipes did not clarify qt size so I wanted to make sure that is done here. This is for a 6 quart instant pot LUX and for this recipe I used a 7" silicone cake pan.

I have decided I need to save links or document what I have cooked so I can find the recipe easily. I am not one of those people who can just “throw something together”. I am always thinking, was that 1 cup or 2? Did I cook it for 20 minutes or 30? UGH. Some people seem to have that knack and come up with all kinds of tasty creations on the fly. I am, um, more like... cooking challenged!! I need help. LOL!

I recently purchased the steamer baskets and this silicone cake pan from QVC but you can find them on Amazon too. It was on sale and I know I am going to be steaming vegetables in the instant pot, because I am lazy. 
? I don’t want to boil a pot of water and have to watch it and then have to strain it, etc. I’d rather do it this way…. anyway, back to breakfast.
Picture
We have chickens and love our farm fresh eggs! I wanted to make a nice breakfast for Jan Paul and since this cake pan was part of the deal, I thought it would be good to use it for our breakfast casserole. 

Since it looked pretty small I figured I should make darn sure everything I whisk together will fit in it. It holds 3-1/4 cups water so I guesstimated it all.

Picture
Picture
First, I sprayed my cooking pan and inside of the lid with some oily spray; then added a cup of water to the inner cooking pot and set the trivet inside for the cake pan to sit on.
Picture
Picture
Next, I whisked together 4 farm fresh eggs and a 1/2 cup milk. 

​We feed the eggshells back to our chickens so I put them in a previously used plastic blueberry container with a lid. I can stick this under the sink out of the way while they dry out before crushing to feed back to the chickens.
Picture
The 4 eggs and milk made about a cup and a half of liquid so I poured that into a separate bowl. Now to add more ingredients to make up another 1-1/2 cups >>>
Picture
We had leftover baked potatoes to use, baked in the instant pot too! I just took the smallest one and peeled and chopped it. Then chopped some ham, put all that in the measuring cup to see that I had a little room left for cheese. You could substitute any veggie if you want to go vegetarian on this. I don't always salt and pepper before cooking but you could do that too. 
Picture
Picture
After adding the cheese, I have a cup and a half of potato, ham and cheese. Stirred all that into the egg mixture.
Picture
Poured all of the 3 cup mixture into the cake pan and added a little more cheese on top. After the fact, I saw that I had enough room to add a little more of anything from another egg to some cooked spinach or even bell pepper if you like that, but went with it as is. Placed the lid on top and pushed the Manual button.
Picture
I thought, from other recipes with more eggs and calling for 30 minutes I could do it in a lot less time but that was not the case. The first time I tried 10 minutes and it was not done, so had to do it another 10 minutes. So ultimately, 20 minutes with 4 eggs is what I’m going with from now on. While our dish this was cooking I was able to do a little cleanup in the kitchen.

After the time was up and it beeped, I used the natural pressure release which took about 10 more minutes. I always flip the pressure release lever for a second to check and see if the pressure has gone. Well worth the wait. It had puffed up even more than in this picture but settled just a little. It was perfect!!
Picture
This dish was so light and fluffy when done I almost called it a soufflé! And my honey was very happy with his breakfast so I was glad he enjoyed it. We actually made 3 breakfasts from this one batch. You can freeze your leftovers or eat the next day. With the first one, we had toast and the other two times we used soft wraps and a little more cheese. MMM Good!!

Makes 6 servings.

INGREDIENTS:
4 eggs
1/2 cup milk
2 slices ham, chopped
1 small baked potato, chopped (baked, peeled and chopped)
​1/4-1/2 cup grated cheese
Salt and pepper to taste

INSTRUCTIONS:
  1. Spray baking pan or coat with oil
  2. Add 1 cup water and trivet to instant pot
  3. Mix all ingredients together 
  4. Pour mixture into pan
  5. Top with additional grated cheese and place cover on top
  6. Set Manual Pressure to 20 minutes
  7. NPR - Let pressure release naturally - takes about 10 minutes

I hope you enjoy this dish as much as we did!! 

Have a good day!

Cheryl @ Pickle Creek Ranch
Young Living Independent Distributor #1176855
essenty.com/cherylintexas/​


0 Comments
    Picture

    Cheryl L. McClure

    Young Living Distributor
    #1176855

    I have retired from the corporate world and now enjoy keeping chickens, ducks, working in the garden and cooking more than ever before!

    More below...

    Categories

    All
    Art
    Bathroom
    Birds
    Butterflies
    Cats
    Chickens
    Cleaning
    Community
    Cooking
    Decor
    Diy
    Ducks
    Edible Landscape
    Essential Oils
    Fire Starters
    Free
    Gardening
    Healthy
    How To
    Instant Pot
    Local
    Make Your Own
    Nature
    NETT
    Rainwater
    Ranch
    Savings
    Tools
    Travel
    Volunteering
    Young Living


    ​Blog Posts:
    PV Assistant
    Malabar Spinach
    ​Throne Scents
    Clean House
    Shrimp
    Weight Management
    Black Swallowtail
    Gluten Free Brownies
    Mint Tea
    Hummingbirds
    Minty Cabbage Slaw
    Respiratory Support #1
    Respiratory Support #2
    Respiratory Support #3
    How to Move a Greenhouse
    ​But I'm So Cute!
    Raised Bed Gardening
    NETT Cleanup
    Exercise at the Ranch
    DIY Chicken Treats
    DIY Fire Starters
    Poblano Pepper Powder
    Green Tomato Weekend
    MYO Nitey Nite EO rollon
    Essential Oils and Chickens
    ​Diffusing Essential Oils
    Longhorns at the Pound?
    What's in your Trough?
    Using Rainwater at the Ranch
    Raindrop with Young Living
    Young Living Price Comparison
    Young Living - Beginner Tips
    The Essential Oil Bottle 
    Sage Essential Oil
    Ear Support and EOs
    Crape Myrtle Surprise
    Quick Cat Shelter
    Chemists's Perspective on YL
    The Athlete
    Chicken House Reveal
    Campus Health
    Concentration
    Accidents and Essential Oils
    Young Living Farms
    Kid Scents Collection
    Itchy Skin
    ​Probiotic - Life 9
    Turmeric and AgilEase
    Enjoying the Harvest
    ​
    Diffusing the Ocean Breeze
    The Lavender Farm
    An Ounce of Prevention
    Traveling with Essential Oils
    The North Sulphur River
    DIY Bleach
    Reflection of Tears
    ​MYO Lotion Bars - DIY
    Zucchini Boats
    Instant Pot Cilantro and Lime Rice
    Instant Pot Zuppa Toscana Soup
    Fresh Guacamole Please!
    Instant Pot Tomato Sauce
    Honey Lavender Lemonade
    Honey Lav/Lemon Ice Cubes
    Tools For The Garden
    Veggie Tian from the Garden

    Archives

    November 2024
    August 2024
    May 2024
    April 2023
    December 2022
    July 2022
    June 2022
    March 2021
    January 2021
    November 2020
    September 2020
    August 2020
    July 2020
    May 2020
    February 2020
    August 2019
    March 2019
    January 2019
    May 2018
    February 2018
    December 2017
    August 2017
    July 2017
    June 2017
    May 2017
    February 2017
    January 2017
    October 2016
    August 2016
    July 2016
    June 2016
    May 2016
    April 2016
    March 2016
    February 2016
    January 2016
    November 2015
    September 2015
    July 2015
    February 2015
    January 2015
    November 2014
    October 2014
    September 2014
    August 2014
    July 2014
    June 2014

    CONTACT INFO
    It's probably pretty obvious I love nature and art. Nature and landscape photography is a part of everyday life at the ranch. There are some pieces available as works of art that I would like to share with you!

    I only recommend Young Living essential oils because I am confident in their purity and the quality of their essential oils and other products. I am not a doctor. The information I post on this website is for educational purposes only. Young Living supplements are designed to improve nutrition; they are not intended to diagnose, treat, cure, or prevent any disease. However, scientific research has established a connection between nutrition and we all know better nutrition leads to better health.

    Please consult with the medical professional of your choice whether using essential oils or not. Remember that being proactive and taking responsibility for your health is in your own best interest. Dig in, research and make wise choices. I encourage you to see what others have done with essential oils and supplements by visiting Oil-Testimonials at http://www.oil-testimonials.com/.

    I hope that this website and blog will provide you with helpful information and resources to achieve your desired goals!!
    ​
    Feel free to contact me if you have questions or concerns as I am here to help and hopefully point you in the right direction!​

    RSS Feed

    Go to> • Home • Cheryl In Texas Art • Photography •  Essential Oils • The Ranch • Blog
Web Hosting by iPage
All photography and graphics crafted by Cheryl L. McClure • does not include iPage template